

Our personal values do not only guide our behaviour, they also influence on our motivation and well-being through how the groups we are with respect and reflect our values. Most organizations or groups are not aware of the values they share, impeding effective collaboration and meaningful relationships between individuals with fruitless discussions that usually go nowhere and leave everyone exhausted.
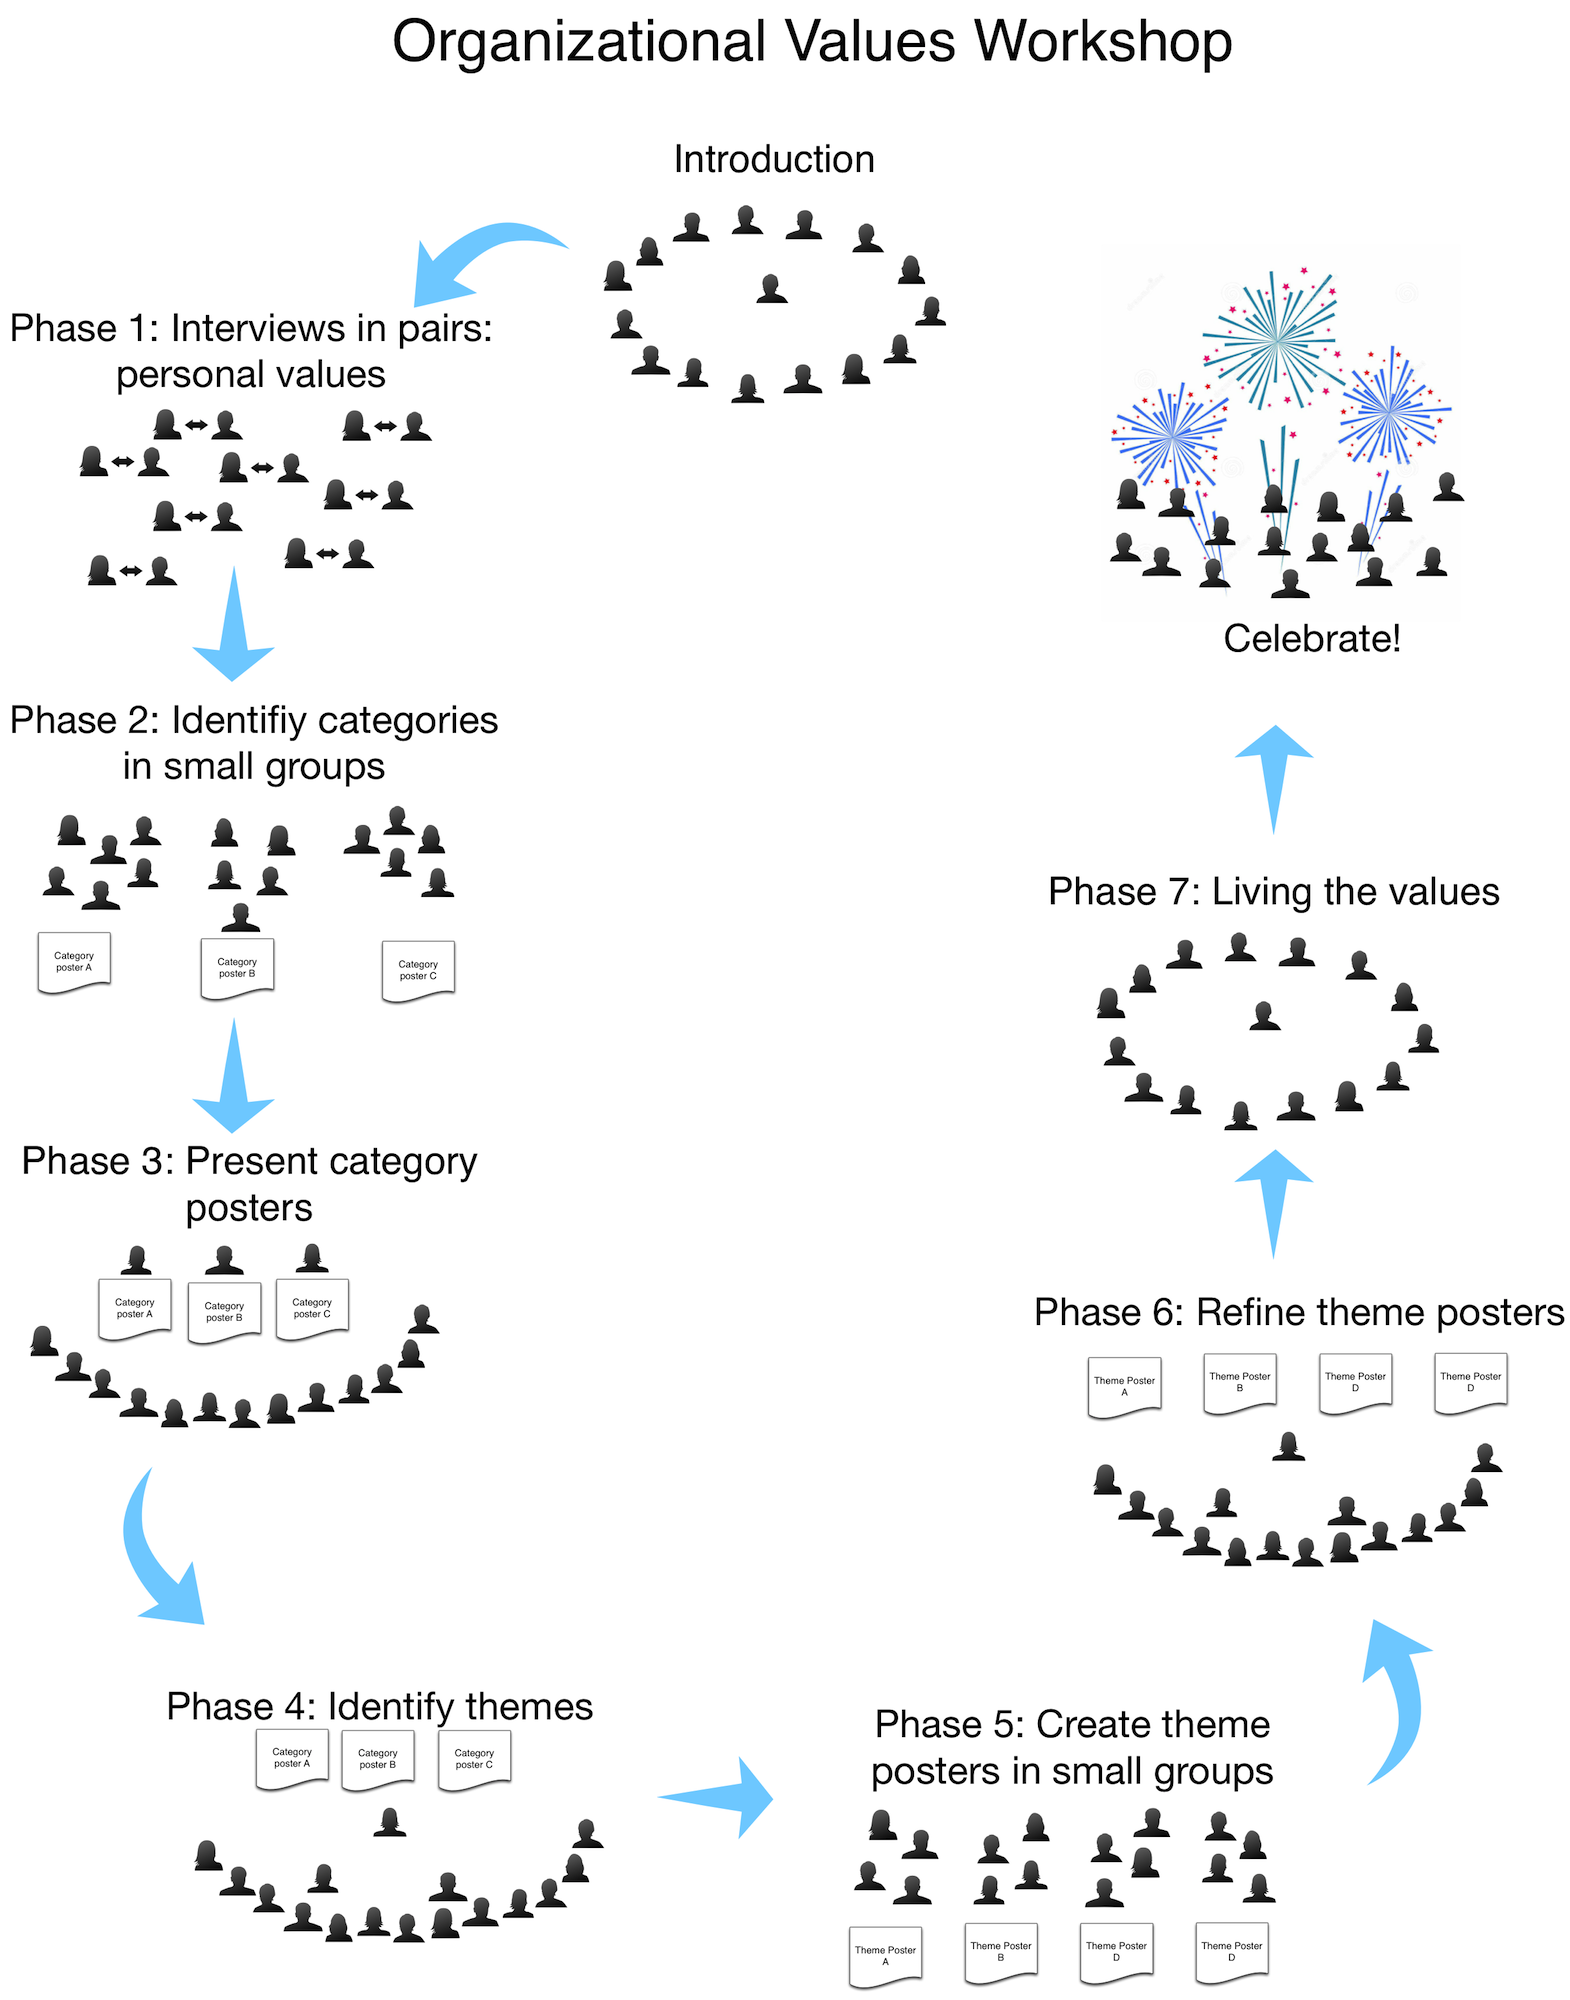
The aim of this workshop is finding the shared values of a group or organization and implementing strategies for the group to learn living those values. It uses a narrative approach to elicit personal values from each participant and then iteratively consolidates those values into themes with positive value statements to guide behaviour. Reserve some time after the workshop to celebrate.
This workshop is only the starting point of a journey, be prepared to invest some time after the workshop to really make these values stick for everyone, and revisit the values in regular intervals to adapt them to changes in environment and group composition.
With experience the workshop can be done in about 3 hrs for a group of 15–20 people, expect considerably more for larger groups, the time required in the consolidation phases is highly dependent on group size. I would suggest doing a half day workshop for small groups, and a day workshop for larger groups. If you have to much time on your hands you can have the group decide how to invest that time into making the values stronger.
Facilitator Guide
Preparation
Gather information about the group and the space. Make sure there is materials and refreshments available. Arrange the space so it can be used for activities with the whole group as well as with smaller groups. If at all possible, the workshop should not take place in an office space. Make sure all participants are invited and have a rough idea what is going to happen at the workshop.
Introduction
5–10 minutes
Materials: flip chart, pen, masking paper
In this phase I welcome the participants, give them an overview of what we are going to do together in the next couple of hours, how long it is roughly going to take, and what my general rules for the workshop are. I ask them if anyone feels they have information they’d like to share, e.g. a fixed time somebody has to leave, or a scheduled fire drill. Sometimes, if sense group dynamics that make this relevant, I ask the group for their expectations (usually in a round).
- Welcome Participants
- present an overview of the workshop (e.g. We will conduct a series of activities that will first elicit each participants personal values, and then consolidate those values first in small groups, then with everyone. We will create 4–5 themes with 4–5 value statements each, and find ways to help the group embrace these values, and periodically review and adapt them.
- Rules for the workshop (these are mine, your rules may vary), put up the rules for everyone to see
- No smartphones.
- Everyone’s free to leave anytime
- We have a break roughly every 60 minutes for 5–10 minutes. Breaks will be announced by the facilitator.
- more rules?
Phase 1: Success Stories in Pairs
20–30 minutes
In this phase we elicit 3–5 personal values from each participant which will form the basis for the group’s values. A narrative approach makes sure we can tap into the core values of each person without having to compensate for reporting bias.
Materials: one pen (felt tip or sharpies), and 10–15 index cards (A6) or sticky notes (A6) per pair.
Result: each participant has 3–5 index cards (or sticky notes) with their values on them
Facilitation: Organize people in pairs with maximum diversity, have one person tell the about a personal experience of success, the other people will note 3–5 criteria that were relevant to the success, briefly discuss to agree on the criteria and wording. Switch roles.
Allow the group 15 minutes for the exercise, and be prepared to extend for another 10 minutes if necessary.
Phase 2: Identify Categories
20–30 minutes
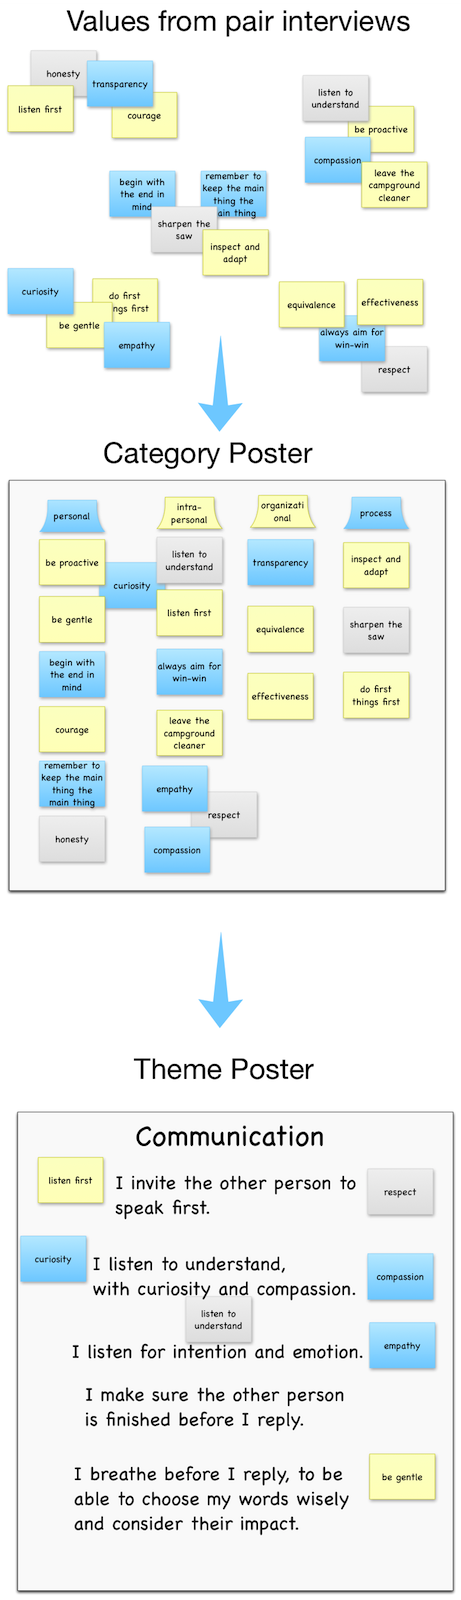
In smaller groups we combine and process values, we eliminate duplicates, identify categories and probably refine the wording of some values. The result is one category poster per group, that organizes values in 4–5 columns
Materials: more index cards or sticky notes, a large sheet of paper (at least A0, e.g. a flip chart block)
Result: a category poster for each group
Facilitation: Form groups form 3–4 pairs (again aim for maximum diversity across departments, roles, ages, gender etc.) .
Have each pair in turn present their values by reading each one out loud before putting it up on the large paper (which is best used in landscape format). Identify 4–5 categories and label them, discuss and iterate. The goal for each group is to create a category poster on a large piece of paper with 4–5 columns.
Allow 15 minutes for the activity, be prepared to extend the time if necessary. The main function of the facilitator(s) her is to spot and resolve blocks in groups.
Phase 3: Present category posters
10–15 minutes
The smaller groups’ category posters are presented to the whole group and put on display for everyone to see.
Materials: masking tape
Result: the category posters are visible to the whole group, photos of each poster.
Facilitation: Now it’s time for each group to present their results, encourage each team to elect a presenter who presents the group’s category poster to the whole organization. Encourage them to only take 1–2 minutes for the presentation. Make sure all category posters are visible to everyone at the end of this step (e.g. stick them to the wall or lay them flat on the ground).
Make sure you photograph the category posters.
Phase 4: Identify Themes (with all participants)
30–60 minutes, depending on group size and composition
Combine the individual categories from the category posters into 4–5 themes. Each theme will be refined later by a small group.
Materials: scissors, masking tape, flip chart paper
Result: 4–5 themes, mostly consisting of slices of the category posters and maybe a few free-floating values. Each theme is assembled onto a piece of flip chart paper.
Facilitation: Consolidate values into max. 5 themes. This step usually requires a lot of effort on the part of the facilitator, new themes will emerge, and sometimes the group decides to drop a few values. In this step it makes sense that only the facilitator moves the cards around, to avoid simultaneous manipulation of several posters at once, because that would lead to participants no longer being able to follow all the changes that take place.
If you feel the group is stuck or not happy with the result, have them walk around the room in silence for 5 minutes and visit all posters in the room briefly, noting what they are in harmony with, and what they would change. Then facilitate for another 15 minutes of group discussion. Get group consent for each of the themes.
Before you enter the next phase, take photos of the results.
Phase 5: Theme Posters
15–45 minutes
In smaller groups we create titles and value statements for each theme we will later refine with the whole group. This is usually rather hard for the participants, it is a complex task that involves taking a high level view and making decisions on other people’s values. The facilitators will help the groups remove blocks and encourage them to aim for “good enough to start”, and not for perfect.
Materials: flip chart paper, pens
Result: One poster for each theme, containing a theme title and 3–5 positive “I”-statements that explain each theme.
Facilitation: Let the participants self-organize in groups (one group per theme), again, have them aim for maximum diversity in groups, and make sure that there is not too much difference in the size of the groups. Each group will then identify a title for their theme and create a set of 3–5 “I”-Statements that provide positive examples for the theme and the underlying values.
The facilitators will move between groups to remove blocks and encourage them to aim for “good enough to start”, rather than perfect. What helps groups a great deal is to make visible which values are reflected in what statement, so they see what is still missing. The group may make the choice to leave a value without expression, e.g. if that value is an outlier.
Give the group an initial time of 15 minutes, extend as necessary.
Phase 6: Refine Theme posters
20–60 minutes, depending on group size and composition
Each of the groups presents their theme poster to the whole group. After each presentation the group can offer ideas how to refine the poster, until everyone thinks the theme is good enough for now.
Materials: Masking tape
Results: Theme posters are approved by all participants
Facilitation: Have each group present their poster to the whole group in 1–2 minutes. Invite the group to offer ideas how to change the poster, probably in 1–2 rounds. Remind the group that the aim is “good enough to start”, we will inevitably refine and adapt the theme posters in the following weeks anyway. Then do a consent round, if necessary, refine and consent again.
Phase 7: Living the values
20–30 minutes
Now we need to find out how we can learn to live the values we created, and agree on a process to review and refine them. The group must accept responsibility for holding the values, this cannot be delegated, but there must be one designated person who will help that group take that responsibility. In businesses that needs to be the CEO, in all other organizations we will have to elect that role.
Materials: flip chart paper, sticky notes (A6), pens, dots for voting
Results: Appointed value coach who will guide the process of living and refining the values, activities to make the values stick, and a date where the whole group will revisit and refine the values.
Facilitation:
- Elect the value coach, who will guide the group into living those values. I suggest using sociocratic elections (descriptions will follow in a few days).
- Collect ideas for activities how to help each other live those values. I suggest doing 1–2 rounds and noting all ideas on a flip chart, then let people dot-vote which of those ideas they want to adopt. If there’s not enough ideas from the group, consult the list of possible activities below to inspire the group.
- Refine those ideas with the group (or in smaller groups if the group is large), and get consent from the group for each idea.
- Propose a review date for the values in 3 months time. I recommend a short timeframe to keep adoption of the values a living process. At that date, the whole group will reconvene for a 1–2 hour session and revisit the values. Do a consent round, if there’s objections, integrate the wisdom and find a date everyone can live with.
- Decide together where to put up the theme posters.
A-Ha Round
5–10 minutes
Do a round and invite everyone to share their A-ha moments during the workshop.
Debrief/Retrospective
10–15 minutes
Material: flip
Do a short retrospective to make sure you as a facilitator can improve the workshop and your facilitation skills. I like to use the following format I learned from James Priest:
Prepare a flip chart (or several of them, depending on group size) with the following sections:
- Achievements
- Facilitation
- Emotional Tone
- Appreciations & Improvements
Do a round where you invite each participant to briefly share their thoughts of they want to (max. one sentence per section)
For larger groups you may want to do this like a group brainstorming to save time: Hand out sticky notes to everyone, and have people note their thoughts, and then stick them on the corresponding section while reading them to the group.
Celebrate
allow for enough time to celebrate
The group has done some hard work and has grown closer together in that workshop, this is ample reason to celebrate. Arrange for something that fits the group.
Appendix
Facilitation hints
In groups over 30 people I suggest having a second facilitator to help resolve blocks in the group exercises (they don’t need a deep understanding of the format).
For some activities I recommend the use of rounds, where the facilitator asks each participant in turn, this is more focussed and takes up less time than a discussion. If much information has been offered in a round, the facilitator may do another round to give those who were first an opportunity to process and react to that information.
A special case is the consent round, where each participant is asked in turn if they accept or object to a proposal. No reasons for objections are given, objections will be “processed” after the round is complete. In the context of this workshop I use consent rounds when I feel it is important to ask each person individually for their consent.
Also I noticed that if all participants are familiar with the decider and resolution protocols we tend to move faster in the group activities, so you might consider teaching those protocols to the group in the introduction.
You can split the group activities into 5 minute iterations, after each iteration people step back and reflect on process and outcome for 2 minutes, before they dive into the next iteration. For some groups this iterative approach helps resolving blocks and moving forward.
Activities to make values stick
These ideas for values related activities are compiled from some of the groups I coached.
- value ambassadors are elected, and will take note of seeing values elegantly applied to a situation. In a weekly 30 min session they present these success stories to the audience. Also ambassadors may take on the personal responsibility to do an intention check if they encounter behaviour that appears incongruent with a group value. If an ambassador wants to leave that role, they simply appoint a successor in the weekly session.
- intention checks everybody may choose to investigate behaviour that appears incongruent with a group value doing and intention check. This assumes the group is familiar with the core protocols.
- theme cards: print[1] decks of cards for each member of the group where each card represents one theme, complete with all the theme statements. People can use those cards to learn the values, and will, most likely, invent a number of games to use those cards with.
- value cards: print[1] decks of cards, each card contains a value statement and the theme it belongs to in smaller print. These decks may be handed out o every member in the group, and will be made available in all areas where people meet and discuss, e.g. meeting rooms. To check the intention of somebody who apparently exhibits behaviour that contrasts a value, silently hand them the corresponding card. The recipient of the card may or may not choose to respond or ask the giver for their opinion. The giver may not follow this up if the receiver does not invite them to. People will also invent other games once the cards are available.
- weekly value meeting: specify a time and place for a weekly group session where the current state of adoption and possible strategies are discussed
- re-design theme posters: draw or design beautiful theme posters. Make sure everyone consents to that, some people may feel attached to the original artefacts from the workshop.
Origins and evolution of the workshop
I learned the basis of that workshop from Josef Merk, and over the years I refined the workshop to its current state. There’s no doubt this workshop will continue to evolve from the feedback I receive.
The original values workshop contained a phase where we decided on the order of importance of the themes, I do think that’s counterproductive. If we have conflicting values, we have to learn to split the difference in each situation where we face that conflict, having one value override the other by default may lead to the person(s) who gave that value to the group feel disrespected.
A lot of the facilitation is using what I learned from working with Sociocracy, and especially from James Priest’s workshops.
- The easiest way to print those cards is to use 160g paper with your laser printer (please check if the printer can handle heavy paper, otherwise you may damage the imaging drum). If you are too lazy to cut the cards, you may want to look at printable business cards. (e.g. clean edge cards from avery). There’s also online services that print decks of playing cards (one example) and a great description how to do this yourself (and interesting read, but not recommended IMHO) ↩

This work by Bernhard Bockelbrink is licensed under a Creative Commons Attribution-ShareAlike 4.0 International License.